Buzzer Interfacing with NodeMCU ESP8266
The project demonstrates how to interface a buzzer with the NodeMCU ESP8266 board.
The buzzer is a simple audio output device that can generate sound when an electric signal is applied to it. By controlling the voltage applied to the buzzer, we can create different sounds and melodies
Buzzer:
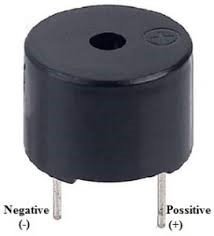
· How Does the Buzzer Work:
The buzzer is an electronic device that converts electrical signals into sound waves. It typically consists of a piezoelectric element or an electromagnetic coil attached to a diaphragm.
When an electric signal is applied to the buzzer, it vibrates the diaphragm, producing sound. In an electromagnetic buzzer, an electromagnetic coil is attached to a diaphragm.
When an electrical signal is applied to the coil, it generates a magnetic field.
The magnetic field attracts and repels a metal plate attached to the diaphragm, causing the diaphragm to vibrate.
The vibrations of the diaphragm produce sound waves.
In the code provided earlier, the buzzer pin is controlled using the digital Write() function.
By setting the pin to HIGH, an electrical signal is applied to the buzzer, causing it to produce sound. Similarly, setting the pin to LOW turns off the electrical signal, silencing the buzzer.
By adjusting the timing and frequency of the signals, you can create different sound patterns and melodies with the buzzer.
· Schematic Circuit Diagram – Buzzer with ESP8266:
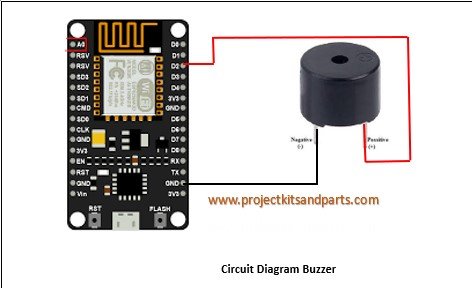
Code:
// www.projectkitsandparts.com
// Buzzer Pin
const int buzzerPin = D2; // Connect the buzzer to D2 pin
void setup() {
// Initialize the buzzer pin as an output
pinMode(buzzerPin, OUTPUT);
}
void loop() {
// Turn on the buzzer
digitalWrite(buzzerPin, HIGH);
delay(1000); // Wait for 1 second
// Turn off the buzzer
digitalWrite(buzzerPin, LOW);
delay(1000); // Wait for 1 second
}
Code Explanation
- The code starts by defining the buzzer pin as buzzerPin with the value D2, which corresponds to the pin connected to the buzzer.
- In the setup() function, the buzzer pin is initialized as an output using pinMode().
- The loop() function contains the main logic of the project.
- Inside the loop() function, the buzzer is turned on by setting the buzzer pin to HIGH using digitalWrite() function.
- A delay of 1 second is introduced using delay() function.
- Then, the buzzer is turned off by setting the buzzer pin to LOW.
- Another delay of 1 second is introduced before the loop repeats.

